[對話式AI-9] 2020 Chatbot Framework Comparison 聊天機器人框架對比

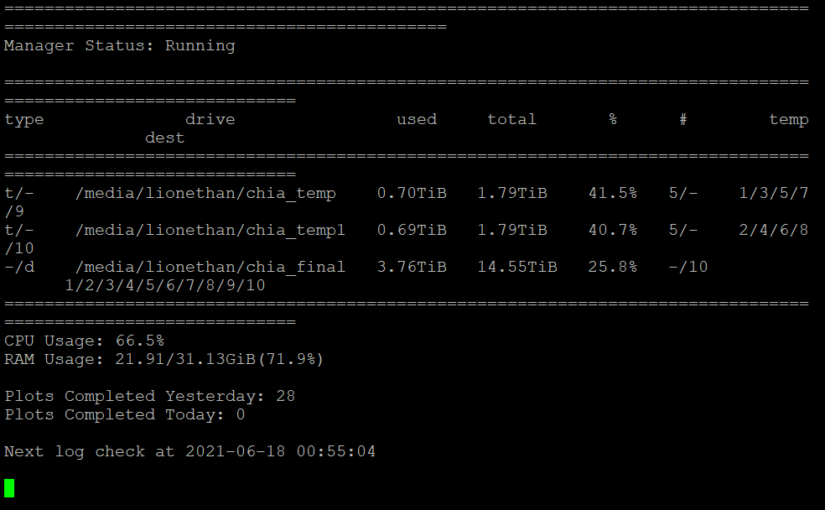
這是經過數個月的調查與更新,所做的2020年聊天機器人框架對比。本表整理了10個知名的Chatbot框架,幾乎涵蓋時下Chatbot所有的Feature;經過一輪基本的驗證後,針對模糊之處再深入使用,藉此得到詳盡的對比。10月做了一次修正與更新,為了將資料整合到部落格的AI專欄上,也克服網誌呈現表格的問題,在此分享給各位業界先進與同好。

TypeFeatureDescriptionGoogleMicrosoftXiao-i Robot小i機器人IBMDYDUSAPFlow XOMeyaGupshupHubspot
DialogflowAzureBotiBot Enterprise
/ Pro
iBot International
/ Express
WatsonDYDURecast.aiFlow XOMeyaGupshupHubspot
Operation & appearanceCode-free backend透過後端介面拖拉流程圖就能建立chatbot,不須寫程式××
Structure & logicKnowledge-independent assistantknowledge(skills)的編輯與assistant的創建彼此獨立×××××××
Bots collaboration可以定義一系列彼此knowledge不相關的bot,然後通過組合bot來構建一個assistant的整體輸出××××
FAQ-based intent支援FAQ格式的intent與答案,而每個intent的答案是固定的×××××××
Multi-languageMulti-language支援多語言對話×××
Auto-language detection系統自動偵測語言,使用者不需自行選擇×××××
Pre-build contentKnowledge預置常用的一般或行業知識,允許客戶快速構建chatbot
Knowledge editIntent -- intent conflict resolution利用AI技術偵測人工填寫intent/user samples時產生的錯誤和衝突××××××××
Intent -- utterance對某個intent編輯不同的問法(擴展問)×××
Entity -- my entity可自行定義entity(例如通過同義詞)××××
系統可自動推薦同義詞×××××××
Multi-turn Dialog若問句資訊不足,系統可以反問使用者(多輪對話)√(ibot ui)√ (scene)√(5)
× (workflow)√(50)
Dialog -- slots系統可自動擷取與填充槽位
Dialog -- disambiguation當使用者的問句匹配到dialog中2個以上的intent節點時,assistant會請使用者決定正確的intent××××××××
Dialog -- 意圖推薦當使用者的問題超出服務範圍,或無法識別意圖時,系統可以推薦相關的意圖給使用者×××××××
Dialog -- multi slots filling對intent缺失的多個資訊,進行一次性的提問,讓使用者可以一次補充所有資訊,而非逐條詢問與回覆×××××××
Dialog -- multi reply對同一intent有多種回答,讓系統可以隨機選擇,產生更自然的對話效果××
Dialog -- Digression允許用戶在dialog中,進行話題(node)的切換,例如從某個流程節點跳轉到另一節點,並允許跳回等。×××
Dialog -- interruptions可讓使用者在對話中暫時討論不同的主題,然後再返回原來的主題××××√ (quit keyword)×××
Knowledge map顯示不同knowledge之間的關係和聯繫×××××××
Answer - variable提供特定參數,讓系統獲取相關資訊,如使用者名稱、IP、URL等內容,也可以直接用variable的形式添加在答案中。×××
Sentiment允許系統對正反及不同程度的情感狀態,做出對應的回應××××××××
Import/export支援knowledge匯出及匯入×××××
DashboardAnalytics dashboard提供報表讓客戶進行數據分析√ (7 D)√ (2 WK)√ (30 D)
√ (30/90 D)√ (3 M)√ (increase)
TestingTester提供測次問句的各種工具
Batch test支援問句的批次測試××××××××
ImproveDeep learning model支援深度類神經網路模型×××××
Active learning從日誌中收集待確認的對話,經客戶確認後學習到知識中××××
Intent recommendation根據已有的對話數據推薦意圖,從而實現更快地訓練××××××
IntegrationCustom plug-in可以客製化整合其他API××
Preview link可提供預覽chatbot的連結××××
Service desk integrations支援無縫轉人工服務××
Versioning允許對assistant的編輯結果,進行版本控管××××××
AuthorizationAccess control可以允許添加訪問人員和管理相應的權限××××××
Search skill支援透過搜索非結構化數據來擴展assistant的knowledge×××××××
DataLog data across instances將正式環境中的insights整合到開發環境中×××××××
Data isolation××××××××
ServiceSLA 99.9%服務等級協議達到99.9%的可用時間×××××××××
Mail subscription支援透過郵件訂閱comments等資料×××××××××
Survey可設立問卷調查模板(對內部或外部調查)×××××××××
對話預處理通過預設的對話匹配規則,可快速自訂簡單的場景××××××××
Matching strictness可調整匹配的閾值××××××××
定時任務支援知識和詞的定時同步××××××××
前後綴處理可自動忽略位於句首或句末的特定詞語或短句××××××××
停用詞可自動忽略句中任意位置的特定詞語×××××××××
Table QA可動態載入結構化數據,並通過自然語言交互,轉換成SQL語句,對資料庫進行查詢×××××××××
質檢自動分析交互日誌,將可能的錯誤應答的對話,提供給維運人員審核××××××××
地區維度根據使用者所在地區給出不同答覆××××××××
知識編輯鎖一位編輯人員操作某個知識時,系統將鎖定該知識群組,使其他人員無法編輯,藉此防止衝突的產生×××××××××

My universal methods for achieving a better gaming experience on Windows handheld with the lowest energy consumption

AMD Algorithm Priority (Not Recommended)

  1. Install AMD Software Adrenalin Edition
  2. Enable HYPR-RX (a series of optimizations)
  3. Lower the game resolution from 1920×1080 to 1280×720, 1366×768, or 1600×900
  4. Ensure Radeon Super Resolution is enabled (upscaling/resolution)
  5. Ensure AMD Fluid Motion Frames is enabled (frame interpolation)
  6. Lower the TDP to achieve 60fps through frame interpolation; further reduce for non-action games

The above steps aim to run games at low frame rates, low resolution, and low TDP, and then use AMD technologies applicable to all games for frame interpolation and upscaling/resolution to achieve a minimum TDP operation of 1080p 60fps. The image quality will be worse than native 1080p 60fps, but it can improve battery life by about 20-40%.

Power Saving Priority

  1. Install AMD Software Adrenalin Edition
  2. Turn off CPU Turbo Boost
  3. Remove frame rate limits in games and other management software
  4. Enable custom mode
  5. Enable Radeon Chill
  6. Set the minimum FPS to 30 and the maximum FPS to 45-60
  7. Enable Radeon Image Sharpening (optional, adds filter to sharpen object edges)

The above steps use Radeon Chill to dynamically lock the frame rate, adjusting to the maximum FPS during intense action and to the minimum FPS when there is no action to save power. Radeon Super Resolution and Fluid Motion Frames cannot be enabled simultaneously with Radeon Chill. Additionally, the low-power Radeon Image Sharpening filter can be used to sharpen object edges and make the image look clearer.

Lossless Scaling Algorithm with Power Saving (Recommended)

  1. Install AMD Software Adrenalin Edition.
  2. Disable CPU Turbo Boost.
  3. Remove frame rate limits in the game and other management software.
  4. Enable custom mode.
  5. Enable Radeon Chill.
  6. Set minimum FPS to 30 and maximum FPS to 45-60.
  7. Install Lossless Scaling.
  8. Set the game to 1280×720 windowed mode.
  9. Enable Scaling Type.
  10. Enable Frame Generation.

The above steps use the Lossless Scaling software to replace Radeon Super Resolution and Fluid Motion Frames. It enables Radeon Chill and simultaneously uses the superior Lossless Scaling algorithm for frame interpolation and upscaling /resolution. This achieves a better gaming experience and battery life compared to the AMD Algorithm, making it the recommended choice for users.

如何讓Windows掌機在最低能耗下實現更好遊戲體驗的通用方法

AMD算法優先(不推薦)

  1. 安裝AMD Software Adrenalin Edition
  2. 開啟HYPR-RX(一系列優化)
  3. 將遊戲解析度從1920×1080調降至1280×720、1366×768或1600×900
  4. 確認Radeon Super Resolution已啟用(升頻/解析度)
  5. 確認AMD Fluid Motion Frames已啟用(補幀數)
  6. 將TDP調降至透過補幀可達60fps,非動作遊戲可進一步調降

上述是在遊戲不支持原生FidelityFX Super Resolution(FSR)的情況下,以低幀數、低解析度和低TDP運行,再透過適用所有遊戲的AMD技術來補幀和升頻(解析度),以達成最低TDP運行1080p 60fps之方法,畫質會比原生1080p 60fps差,但可提升20-40%左右的續航力。

省電優先

  • 安裝AMD Software Adrenalin Edition
  • 關閉CPU睿頻
  • 在遊戲和其他管理軟體解除幀數限制
  • 開啟自訂模式
  • 啟用Radeon Chill
  • 設置最小FPS 30,最大FPS 45-60
  • 開啟Radeon Image Shapening(加濾鏡銳化物體邊緣,可選)

上述是利用Radeon Chill動態鎖幀,在激烈動作時調整至最大FPS,在沒有動作時調整至最小FPS,用最少的電力換取更好的體驗(Radeon Super Resolution及Fluid Motion Frames不可與Radeon Chill同時啟用)。還可加上低功耗的Radeon Image Shapening濾鏡銳化物體邊緣,讓畫面看起來更清晰。

Lossless Scaling算法與省電(推薦)

  • 安裝AMD Software Adrenalin Edition
  • 關閉CPU睿頻
  • 在遊戲和其他管理軟體解除幀數限制
  • 開啟自訂模式
  • 啟用Radeon Chill
  • 設置最小FPS 30,最大FPS 45-60
  • 安裝Lossless Scaling
  • 將遊戲設置為1280×720視窗模式
  • 啟用Scaling Type
  • 啟用Frame Generation

上述是以Lossless Scaling軟體取代Radeon Super Resolution及Fluid Motion Frames,啟用Radeon Chill同時使用更好的Lossless Scaling算法補幀和升頻(解析度),可達成比AMD算法更好的遊戲體驗與續航力,推薦網友優先採用。

My Experience with XREAL Air 2 Pro AR Glasses

As an enthusiast of VR, AR, and MR, I sincerely believe that Apple Vision Pro’s biggest competitor in the future is XREAL (formerly NREAL). XREAL introduced the XREAL Air product, achieving an ultimate slim design for AR glasses and using a smartphone as the computational solution by a Chinese company.

The XREAL Air display component has a limited field of view (FOV) of only 46 degrees, which falls short of the immersive requirements for VR experiences. The developer ecosystem is not robust enough, and there is no dedicated app store, resulting in a lack of sufficient content for the primary AR experience. However, due to its relatively affordable price, lightweight design, higher pixel density (PPI), and a real background light (non-VR-generated realistic background), XREAL Air serves as a 3 DoF giant screen display with superior clarity and comfort compared to various VR devices. It is especially suitable for watching videos and playing games while lying down.

XREAL Air, as an excellent giant screen, is often used in conjunction with the Steam Deck for gaming or with high-end Samsung phones supporting the Dex operating system for watching videos. You may also consider purchasing the hastily released Beam, the official computing terminal device from XREAL, to upgrade the giant screen from 0 DoF to 3 DoF. However, its performance, image quality, operating experience, and application support are not as good as the former two options.

In addition, the second-generation product, XREAL Air Pro 2, improves comfort, speaker sound quality, and achieves individual color calibration. The upcoming XREAL Air 2 Ultra adds two cameras to support 6 DoF and hand tracking, emphasizing Spatial Computing, taking a step further toward XR, resembling a more affordable and lightweight version of Apple Vision Pro. However, facing Apple Vision Pro’s luxurious hardware, XREAL Air 2 Ultra is noticeably lacking in numerous sensors, raising concerns about its overall effectiveness.

Nevertheless, the simplified hardware architecture of XREAL Air 2 Ultra has increased my expectations for the ultimate slim and comfortable XR glasses. As a user of XREAL Air and Air 2 Pro, I will now compare the hardware advancements in the context of video watching and gaming scenarios.

The improvements of XREAL Air 2 Pro are as follows:

  • 10% lighter (72 grams for the second generation, compared to 79 grams for the first generation).
  • 20% higher brightness (500 nits for the second generation, compared to 400 nits for the first generation).
  • Color calibration on an individual basis, resulting in smaller color deviations.
  • More balanced weight distribution in the frame, preventing a top-heavy feel.
  • The nearsighted glasses frame is positioned at a more appropriate distance from the eyeballs, avoiding contact between eyelids and lenses.
  • Softer nose pad cushions, reducing the likelihood of imprints and discomfort on the nose.
  • The Pro version includes electrochromic lenses, allowing for three-stage adjustment of outdoor lighting, providing practical functionality.

The drawbacks are as follows (not officially disclosed by the manufacturer):

  • Smaller display components and a reduced pupil distance (PD), resulting in blurred edges of the display, with more pronounced effects for individuals with larger pupil distances. This issue was not present in the first generation.
  • Unexplained reasons leading to high-contrast scenes, such as white text on a black background, causing more severe glare compared to the first generation.

XREAL Air 2 Pro AR眼鏡的使用心得

身為VR、AR及MR的愛好者,我真心認為Apple Vision Pro,未來最大的競爭者是XREAL(前NREAL);一間推出XREAL Air產品,把AR眼鏡極致輕薄化,用手機作為運算解決方案的中國公司。

由於XREAL Air顯示元件只有46度的可視範圍(FOV),達不到VR沉浸體驗的要求,開發者生態不夠蓬勃,也還沒有自己的應用商店,以至於主打的AR體驗沒有足夠的內容。但受益於相對親民的價格、輕薄的體積、較高的像素密度(PPI),以及真實的背景光(非VR再生成的現實背景),作為3 DoF巨屏顯示器,畫面清晰度及舒適度都遠勝過各種VR設備,特別適合躺著看影片和玩遊戲。

XREAL Air作為一塊優秀的巨屏(巨大顯示器),用戶經常搭配Steam Deck來玩遊戲,或使用支持Dex操作系統的三星高階手機來看影片;你也可以考慮購入官方倉促推出的計算終端裝置Beam,將巨屏從0 DoF提升至3 DoF,但其效能、畫質、操作體驗與應用支持,都不如前面兩者。

此外,XREAL二代產品Air Pro 2,提升了配戴的舒適度、揚聲器音質,並做到逐台調色,即將發布的XREAL Air 2 Ultra還增加了兩個攝像頭,以支持6 DoF和手部追蹤,主打空間運算Spatial Computing,讓這個產品進一步邁向XR,頗有Apple Vision Pro輕薄廉價版本的架式。但面對Apple Vision Pro豪華的硬體,XREAL Air 2 Ultra明顯缺乏眾多感測器,其效果令人堪憂。

無論如何,XREAL Air 2 Ultra簡潔的硬體架構,讓我對極致輕薄、舒適配戴的XR眼鏡有了更多期待。最後作為XREAL Air及Air 2 Pro的用戶,我將以看影片與玩遊戲的使用場景,為您比較二代硬體的進步:

Xreal Air 2 Pro進步如下:

  • 重量輕10%(二代72克,一代79克)
  • 亮度高20%(二代500尼特,一代400尼特)
  • 經過逐台調色,色差更小
  • 鏡腳有更平衡的配重,不會頭重腳輕
  • 近視鏡架與眼球有更適當的距離,避免眼皮碰到鏡片
  • 更軟的氣墊鼻托,讓鼻子不容易產生壓痕與不適
  • Pro版本還有電致變色鏡片,可以三段調整戶外光線,此功能非常實用

缺點如下(官方未揭示):

  • 較小的顯示器元件及更小的瞳距(PD),導致畫面邊緣模糊,瞳距大者會更嚴重,一代無此問題
  • 不明原因,導致高反差畫面,如黑底白字,會有更嚴重的散光,一代無此問題

Chia奇亞幣P圖8核每天28P(2.8TB)配置方法

建議電腦配置:
處理器 i7-10700 or 11700
主機板 b460 / z490 / b560 / z590 (支援兩個以上的M.2插槽)
記憶體 16GB D4-3200 x 2
系統碟 SATA SSD 250GB
緩存碟 M.2 SSD PCIE4 2TB x 2 (其實1TB x 2就可以了)

BIOS配置:
Intel C-State設為Disabled

# This is a single variable that should contain the location of your chia executable file. This is the blockchain executable.
#
# WINDOWS EXAMPLE: C:\Users\Swar\AppData\Local\chia-blockchain\app-1.1.5\resources\app.asar.unpacked\daemon\chia.exe
#   LINUX EXAMPLE: /usr/lib/chia-blockchain/resources/app.asar.unpacked/daemon/chia
#  LINUX2 EXAMPLE: /home/swar/chia-blockchain/venv/bin/chia
#  MAC OS EXAMPLE: /Applications/Chia.app/Contents/Resources/app.asar.unpacked/daemon/chia
chia_location: /home/lionethan/chia-blockchain/venv/bin/chia


manager:
  # These are the config settings that will only be used by the plot manager.
  #
  # check_interval: The number of seconds to wait before checking to see if a new job should start.
  #      log_level: Keep this on ERROR to only record when there are errors. Change this to INFO in order to see more
  #                 detailed logging. Warning: INFO will write a lot of information.
  check_interval: 60
  log_level: ERROR


log:
  # folder_path: This is the folder where your log files for plots will be saved.
  folder_path: /home/lionethan/.chia/mainnet/plotter


view:
  # These are the settings that will be used by the view.
  #
  #            check_interval: The number of seconds to wait before updating the view.
  #           datetime_format: The datetime format that you want displayed in the view. See here
  #                            for formatting: https://docs.python.org/3/library/datetime.html#strftime-and-strptime-format-codes
  # include_seconds_for_phase: This dictates whether seconds are included in the phase times.
  #        include_drive_info: This dictates whether the drive information will be showed.
  #               include_cpu: This dictates whether the CPU information will be showed.
  #               include_ram: This dictates whether the RAM information will be showed.
  #        include_plot_stats: This dictates whether the plot stats will be showed.
  check_interval: 60
  datetime_format: "%Y-%m-%d %H:%M:%S"
  include_seconds_for_phase: false
  include_drive_info: true
  include_cpu: true
  include_ram: true
  include_plot_stats: true


notifications:
  # These are different settings in order to notified when the plot manager starts and when a plot has been completed.

  # DISCORD
  notify_discord: true
  discord_webhook_url: https://discordapp.com/api/webhooks/844138664589393920/io3jQxoTO6XoYOtbddojJkE-IXDSsWZ8wpIxTHgaFpdYvBgfRuHjbBYBMECgXl1em3uG

  # IFTTT, ref https://ifttt.com/maker_webhooks, and this function will send title as value1 and message as value2.
  notify_ifttt: false
  ifttt_webhook_url: https://maker.ifttt.com/trigger/{event}/with/key/{api_key}

  # PLAY AUDIO SOUND
  notify_sound: false
  song: audio.mp3

  # PUSHOVER PUSH SERVICE
  notify_pushover: false
  pushover_user_key: xx
  pushover_api_key: xx
  
  # TELEGRAM
  notify_telegram: false
  telegram_token: xxxxx

  # TWILIO
  notify_twilio: false
  twilio_account_sid: xxxxx
  twilio_auth_token: xxxxx
  twilio_from_phone: +1234657890
  twilio_to_phone: +1234657890


instrumentation:
  # This setting is here in case you wanted to enable instrumentation using Prometheus.
  prometheus_enabled: false
  prometheus_port: 9090


progress:
  # phase_line_end: These are the settings that will be used to dictate when a phase ends in the progress bar. It is
  #                 supposed to reflect the line at which the phase will end so the progress calculations can use that
  #                 information with the existing log file to calculate a progress percent.
  #   phase_weight: These are the weight to assign to each phase in the progress calculations. Typically, Phase 1 and 3
  #                 are the longest phases so they will hold more weight than the others.
  phase1_line_end: 801
  phase2_line_end: 834
  phase3_line_end: 2474
  phase4_line_end: 2620
  phase1_weight: 33.4
  phase2_weight: 20.43
  phase3_weight: 42.29
  phase4_weight: 3.88


global:
  # These are the settings that will be used globally by the plot manager.
  #
  # max_concurrent: The maximum number of plots that your system can run. The manager will not kick off more than this
  #                 number of plots total over time.
  # max_for_phase_1: The maximum number of plots that your system can run in phase 1.
  # minimum_minutes_between_jobs: The minimum number of minutes before starting a new plotting job, this prevents
  #                               multiple jobs from starting at the exact same time. This will alleviate congestion
  #                               on destination drive. Set to 0 to disable.
  max_concurrent: 16
  max_for_phase_1: 4
  minimum_minutes_between_jobs: 5


jobs:
  # These are the settings that will be used by each job. Please note you can have multiple jobs and each job should be
  # in YAML format in order for it to be interpreted correctly. Almost all the values here will be passed into the
  # Chia executable file.
  #
  # Check for more details on the Chia CLI here: https://github.com/Chia-Network/chia-blockchain/wiki/CLI-Commands-Reference
  #
  # name: This is the name that you want to give to the job.
  # max_plots: This is the maximum number of jobs to make in one run of the manager. Any restarts to manager will reset
  #            this variable. It is only here to help with short term plotting.
  #
  # [OPTIONAL] farmer_public_key: Your farmer public key. If none is provided, it will not pass in this variable to the
  #                               chia executable which results in your default keys being used. This is only needed if
  #                               you have chia set up on a machine that does not have your credentials.
  # [OPTIONAL] pool_public_key: Your pool public key. Same information as the above.
  #
  # temporary_directory: Can be a single value or a list of values. This is where the plotting will take place. If you
  #                      provide a list, it will cycle through each drive one by one.
  # [OPTIONAL] temporary2_directory: Can be a single value or a list of values. This is an optional parameter to use in
  #                                  case you want to use the temporary2 directory functionality of Chia plotting.
  # destination_directory: Can be a single value or a list of values. This is the final directory where the plot will be
  #                        transferred once it is completed. If you provide a list, it will cycle through each drive
  #                        one by one.
  #
  # size: This refers to the k size of the plot. You would type in something like 32, 33, 34, 35... in here.
  # bitfield: This refers to whether you want to use bitfield or not in your plotting. Typically, you want to keep
  #           this as true.
  # threads: This is the number of threads that will be assigned to the plotter. Only phase 1 uses more than 1 thread.
  # buckets: The number of buckets to use. The default provided by Chia is 128.
  # memory_buffer: The amount of memory you want to allocate to the process.
  # max_concurrent: The maximum number of plots to have for this job at any given time.
  # max_concurrent_with_start_early: The maximum number of plots to have for this job at any given time including
  #                                  phases that started early.
  # initial_delay_minutes: This is the initial delay that is used when initiate the first job. It is only ever
  #                        considered once. If you restart manager, it will still adhere to this value.
  # stagger_minutes: The amount of minutes to wait before the next plot for this job can get kicked off. You can even set this to
  #                  zero if you want your plots to get kicked off immediately when the concurrent limits allow for it.
  # max_for_phase_1: The maximum number of plots on phase 1 for this job.
  # concurrency_start_early_phase: The phase in which you want to start a plot early. It is recommended to use 4 for
  #                                this field.
  # concurrency_start_early_phase_delay: The maximum number of minutes to wait before a new plot gets kicked off when
  #                                      the start early phase has been detected.
  # temporary2_destination_sync: This field will always submit the destination directory as the temporary2 directory.
  #                              These two directories will be in sync so that they will always be submitted as the
  #                              same value.
  # exclude_final_directory: Whether to skip adding `destination_directory` to harvester for farming
  # skip_full_destinations: When this is enabled it will calculate the sizes of all running plots and the future plot
  #                         to determine if there is enough space left on the drive to start a job. If there is not,
  #                         it will skip the destination and move onto the next one. Once all are full, it will
  #                         disable the job.
  # unix_process_priority: UNIX Only. This is the priority that plots will be given when they are spawned. UNIX values
  #                        must be between -20 and 19. The higher the value, the lower the priority of the process.
  # windows_process_priority: Windows Only. This is the priority that plots will be given when they are spawned.
  #                           Windows values vary and should be set to one of the following values:
  #                             - 16384 (BELOW_NORMAL_PRIORITY_CLASS)
  #                             - 32    (NORMAL_PRIORITY_CLASS)
  #                             - 32768 (ABOVE_NORMAL_PRIORITY_CLASS)
  #                             - 128   (HIGH_PRIORITY_CLASS)
  #                             - 256   (REALTIME_PRIORITY_CLASS)
  # enable_cpu_affinity: Enable or disable cpu affinity for plot processes. Systems that plot and harvest may see
  #                      improved harvester or node performance when excluding one or two threads for plotting process.
  #        cpu_affinity: List of cpu (or threads) to allocate for plot processes. The default example assumes you have
  #                      a hyper-threaded 4 core CPU (8 logical cores). This config will restrict plot processes to use
  #                      logical cores 0-5, leaving logical cores 6 and 7 for other processes (6 restricted, 2 free).
  - name: mp600_1
    max_plots: 999
    farmer_public_key:
    pool_public_key:
    temporary_directory: /media/lionethan/chia_temp
    temporary2_directory:
    destination_directory:
      - /media/lionethan/chia_final
    size: 32
    bitfield: true
    threads: 2
    buckets: 128
    memory_buffer: 4000
    max_concurrent: 7
    max_concurrent_with_start_early: 8
    initial_delay_minutes: 0
    stagger_minutes: 60
    max_for_phase_1: 2
    concurrency_start_early_phase: 4
    concurrency_start_early_phase_delay: 0
    temporary2_destination_sync: false
    exclude_final_directory: false
    skip_full_destinations: true
    unix_process_priority: 10
    windows_process_priority: 32
    enable_cpu_affinity: false
    cpu_affinity: [ 0, 1, 2, 3, 4, 5, 6, 7, 8, 9, 10, 11, 12, 13, 14, 15 ]
    
  - name: mp600_2
    max_plots: 999
    farmer_public_key:
    pool_public_key:
    temporary_directory: /media/lionethan/chia_temp1
    temporary2_directory:
    destination_directory:
      - /media/lionethan/chia_final
    size: 32
    bitfield: true
    threads: 2
    buckets: 128
    memory_buffer: 4000
    max_concurrent: 7
    max_concurrent_with_start_early: 8
    initial_delay_minutes: 0
    stagger_minutes: 60
    max_for_phase_1: 2
    concurrency_start_early_phase: 4
    concurrency_start_early_phase_delay: 0
    temporary2_destination_sync: false
    exclude_final_directory: false
    skip_full_destinations: true
    unix_process_priority: 10
    windows_process_priority: 32
    enable_cpu_affinity: false
    cpu_affinity: [ 0, 1, 2, 3, 4, 5, 6, 7, 8, 9, 10, 11, 12, 13, 14, 15 ]

Airpods 2與Airpods Pro評測與對比

去年在香港機場買了Airpods 2後,由於它戴起來非常舒適,如今已經變成我最常用的耳機,雖然他的音質不如其他高端耳機,但也相當夠用了。萬萬沒想到的是,幾個月後擁有降噪功能的Airpods Pro發表了。

雖然我平常也有隔音降噪的需求,但考慮到荷包的重量,我一直忍受捷運及街頭的噪音,直到今天看到PChome週年慶,才以便宜新台幣1800元,也就是6190元的特價購入。使用幾個小時之後,在此提供Airpods 2與Airpods Pro的比較與心得,給想要購買的朋友參考。

AirPods 2與AirPods Pro

AirPods 2

優點:

  • 目前用戴過最舒適的耳塞式耳機,有時甚至會忘了它的存在
  • 擁有中上的音質,符合一般大眾的口味
  • 無線耳機與麥克風功能,除了iOS裝置,也適用於Android及其它藍芽裝置
  • 可提供超過24小時的聆聽時間,或長達18小時的通話時間
  • 充飽一次電後,最長可提供5小時的聆聽時間或3小時的通話時間
  • 網路售價約新台幣4090元,比AirPods Pro便宜2100元

缺點:

  • 偶爾會受到干擾,導致一耳或全部連線中斷,但大多數的情況會很快恢復
  • 採用Lightning接頭充電,Android使用者必須多帶一條充電線
  • 只能在iOS裝置上,呼叫Siri語音助理;也就是無法在Android上呼叫Google Assistant
  • 開放式耳塞,無隔音效果,在吵雜的環境必須調高音量,可能會影響耳朵的健康

獅子評分

評分:5 分,滿分為 5。

AirPods Pro

優點:

  • 目前用戴過最舒適的耳道式耳機
  • 跟Airpods 2差不多的中上音質,符合一般大眾的口味
  • 無線耳機與麥克風功能,除了iOS裝置,也適用於Android及其他藍芽裝置
  • 物理隔音加降噪功能,確實可以消除80%的低頻噪音,適合在捷運上使用
  • 通透模式下,還原的外界聲音,近似真實的情況

缺點:

  • 由於塞住耳道,舒適度還是略差於Airpods 2,甚至是一般耳塞式耳機,久戴會有疼痛感
  • 偶爾會受到干擾,導致一耳或全部連線中斷,但大多數的情況會很快恢復
  • 採用Lightning接頭充電,Android使用者必須多帶一條充電線
  • 只能在iOS裝置上,呼叫Siri語音助理;也就是無法在Android上呼叫Google Assistant
  • 開啟降噪模式,在馬路上使用必須特別注意安全
  • 由於降噪功能,聆聽與通話時間比起Airpods 2略少10%
  • 雖是耳道式耳機,但設計上只有貼緊耳道而未深入,隔音效果不如一般耳道式耳機
  • 網路售價約新台幣6190元,比AirPods 2貴2100元

獅子評分

評分:4.5 分,滿分為 5。

網友們可能會詢問,那麼Airpods 2和AirPods Pro哪個好?若撇除預算限制,我認為好壞取決於你的使用環境。Airpods 2有最舒服的設計,但容易受噪音影響,最適合在室內的使用;Airpods Pro則是為了隔音,犧牲了一點舒適性,並擁有良好的降噪功能,特別適合在通勤及戶外使用。如果你預算充足,買兩款交替使用也不嫌多餘。

Cybershoes座式全向跑步機評測

Cybershoes是一台低成本的座式全向跑步機,技術上左右腳各採用一條滾輪感測,因此僅支援前後滑步,無法平移;其已足夠讓你在開放世界中順暢遊走,但在室內場景移動則有點彆腳,可能需要花一點時間練習。

Cybershoes 包裝外觀

筆者體質不太容易有VR動暈症,但在Skyrim、Fallout 4等戶外場景用搖桿走,不開移動時的防暈遮罩,還是會覺得不適,使用Cybershoes後,就算把遮罩拿掉也不會VR暈,防暈效果和體驗都非常好。

至於Alyx等室內場景,由於Cybershoes無法平行移動,場景對步伐精準度要求又比較高,我時常會因為冗餘動作,不慎讓滾輪後滑,導致不時產生些許倒退,影響操作及體驗。但這點在開放場景中,可能是因為視野和場地比較遼闊,所以影響不大;也就是說,雖是用Cybershoes走路,但是以滑步的方式進行,因此有點像是用腳在開車,曲折的小徑比較不好走。

優點

  • 可以用Cybershoes鞋底裝置滑步,取代搖桿走路、跑步及倒退
  • 經證實可減緩VR暈動症
  • 採用低延遲的無線傳輸,反應時間良好
  • 有實體滑桿可供調節80%到120%的行走速度
  • 椅子與地毯美觀,鞋底堅固耐用
  • 長時間使用,有類似飛輪的運動效果
  • 比起動輒3000美金以上的全向跑步機,此方案只需349美金(不含運費)

缺點

  • 雖然說是跑步機,實際上是利用滑步驅動雙腳各一根的滾輪旋轉,以得到行走速度
  • 不支援平移走路,這是由於坐在高腳椅上平移或轉向,滾輪會產生一致的軌跡,系統難以區分
  • 向前走路若稍有不慎,可能會驅動滾輪反向,導致些許後退;倒退走路反之亦然。可透過練習改善
  • 不是所有VR內容都支援;所支援的不同VR內容,行走速度和體驗也不一致
  • 堅硬的Cybershoes鞋底使用時,容易撞到椅子底盤與中柱發出聲響
  • 從芬蘭訂購到台灣,運費高達130美金

如上所述,Cybershoes非常適合開放世界,連續走了幾小時後,就像是在騎飛輪運動,不只是腿痠,屁股還很痛;但在室內場景中,需要練習才能走得好,我正在設法減少冗餘動作,並在不移動時固定滾輪,透過精準操作克服上述問題。

獅子評分

評分:4 分,滿分為 5。

Kat Loco VR運動系統評測

日前購買的Kat Loco(VR locomotion system)及腳踏墊終於到了,這是可以在VR中模擬步行的裝置;經過這幾天的測試,得到了一些結論。由於本身是技術背景的,對於此產品只採用三個六軸傳感器,已經可以預期體驗不會太好了;但有介於用VR手把進行走動的不直覺,除了自身使用之外,主要也想要借此探索感測器和深度學習,在VR輔助設備的應用,也許有一天會想自己立項開發,以下是我的評測心得。

Kat VR腳踏墊

產品外觀

優點:

  • 可協助使用者保持在場地的中心。
  • 踏墊夠厚,即使穿鞋也可以感受到。

缺點:

  • 由於踏墊的觸感不同於地板,走動出入時會影響沉浸感。
  • 踏墊較厚,也容易掀開,會經常絆到腳。

結論:

  • 放上踏墊反而危險,容易因絆到腳而跌倒,適得其反。

獅子評分

評分:2 分,滿分為 5。

Kat Loco

產品外觀
使用者介面

優點:

  • 可用原地踏步的方式前行。
  • 精美的包裝。
  • 美觀的使用者介面。

缺點:

  • 原地踏步動作必須維持一定的速度才能行走,非常耗費力氣;也很難藉由踏步的速度,控制行走的速度。
  • 動作的實際延遲時間肯定比官方宣稱的20ms還要長,反應不夠即時。
  • 透過擺出向前、向後、向左、向右,各四種姿勢的巡航模式,根本無法正常使用。
  • 可以從監測數據中發現,雙腳配戴的位置角度,對六軸傳感器的影響非常巨大,讓準確度大打折扣。
  • 線上說明文件不足,即使想要調校也難以進行。

結論:

  • 由於巡航模式無法正常使用,就只能原地踏步筆直往前走,非常愚蠢。
  • 另外一套運動系統Cybershoes,坐著使用滾輪鞋移動,可能會比這個更好用。
  • 雖沒用過全向跑步機,但觀察過影片,目前市面上跑步機的體驗,可能都不會太理想。
  • 以上,讓我確信使用Inside-out定位在足夠大的空間(可大至操場),使用真實的雙腳到處跑蹲跳,可以得到最好的體驗。

獅子評分

評分:1 分,滿分為 5。

Oculus Quest有線與無線串流比較

由於近期Vault發表了Half-Life的VR大作,促使我訂購了Oculus Link連接線,搭配Oculus Quest重啟PC VR之旅。在嘗試使用Link技術後,對其體驗基本滿意,但仍希望擁有更好的效果,因此對備受好評的Virtual Desktop感到好奇;除了用自身的小米路由器測試外,也購買了支援MU-MIMO的最新路由器,避免多裝置連線時影響串流速度。以下是我的測試心得分享。

Oculus Link 頭戴式裝置連接線

Oculus Link 連接線
  • 數據
    • 連接線NT$2400
    • USB 3.0轉Type C轉接頭(VL160晶片)NT$300
    • 軟體官方免費提供
    • 線長5公尺
    • 附帶Quest頭戴顯示器用的線纜固定器,防止線纜脫落
  • 優點
    • 可以用Quest玩PC VR
    • 無論是顯示器或控制器延遲,都比無線更少
    • 沒有無線偶爾出現的卡頓問題
    • 可以一邊玩一邊充電
  • 缺點
    • 壓縮率高導致色彩黯淡,而且目前不能調整壓縮率
    • 轉向時會常常卡到線,影響VR沉浸感;可用吊線支架改善體驗,但仍不如無線方便

獅子評分

評分:3 分,滿分為 5。

舊款 Wi-Fi 5 無線路由器(支援802.11ac)+ Virtual Desktop

2014年 小米路由器 mini
  • 數據
    • 路由器NT$600
    • 軟體NT$600
    • 平均延遲(Latency) 25ms,不含控制器延遲
    • 最高傳輸速率(Video Bitrate)約49Mbps
    • 電池續航力約2.5小時
  • 優點
    • 可以用Quest玩PC VR
    • 少了線的束縛,讓VR沉浸感更好
    • 影音串流壓縮技術佳,色彩較Oculus Link好
  • 缺點
    • 延遲較有線多一倍左右,但仍落在可以接受的範圍
    • 無線會受到環境干擾,偶爾會卡頓,穩定度不如Oculus Link
    • 小米路由器無法發揮802.11ac的性能,導致傳輸速率只有49Mbps
    • 目前只要是無線VR頭戴顯示器,都會有續航力低的問題
    • 多裝置連線時會影響串流速度

獅子評分

評分:4 分,滿分為 5。

Wi-Fi 6 無線路由器(支援802.11ax、MU-MIMO)+ Virtual Desktop

2019年 TP-link AX10
  • 數據
    • 路由器NT$2300
    • 軟體NT$600
    • 平均延遲(Latency) 25ms,不含控制器延遲,實測數字比前者更穩定
    • 最高傳輸速率(Video Bitrate)約92Mbps
    • 電池續航力少於2.5小時
  • 優點
    • 可以用Quest玩PC VR
    • 少了線的束縛,讓VR沉浸感更好
    • 影音串流壓縮技術佳,色彩較Oculus Link好
    • MU-MIMO技術可降低多裝置連線時,對串流的影響
  • 缺點
    • 延遲較有線多一倍左右,但仍落在可以接受的範圍
    • 無線會受到環境干擾,偶爾會卡頓,穩定度不如Oculus Link
    • Oculus Quest只支援到802.11ac,我考慮到後續升級與其他用途,才直接上802.11ax
    • 目前只要是無線VR頭戴顯示器,都會有續航力低的問題
    • 比較高的Video Bitrate,會讓續航力差的Quest頭戴顯示器更加耗電;意外的是92Mbps與49Mbps相比,在一般遊戲中畫質差異並不大,但玩動作遊戲就能感受到串流率不足帶來的模糊感。
Virtual Desktop的使用者介面

結論

  • 使用線纜的Oculus Link技術,擁有絕對穩定的串流與低延遲,在顯示與控制上,適合要求反應速度及低延遲的動作遊戲等;但得到此優勢的同時,線纜卻會造成移動不便。缺點是畫面壓縮率高導致灰濛,在不比較的情況下沒有傷害。
  • 無線的Virtual Desktop串流技術適合看FPS僅有24幀的電影,或不要求反應速度及低延遲的遊戲;但在動作遊戲中,卻又因無線所帶來的順暢移動,為其劣勢加分。偶爾會出現的卡頓,並不影響遊玩體驗,所以適用於大部分遊戲,推薦玩家採用此方案。
  • 日前Oculus要求Virtual Desktop移除遊戲串流功能,使用者必須自行透過SideQuest解禁;相信是因為Virtual Desktop串流技術過於強勢,會使得擁有高端PC的玩家,將大部分消費轉移至Steam、Viveport等平台,的確對Oculus Store的發展不利;特別是為Quest一體機開發的遊戲,以及平台上的影音內容。

獅子評分

評分:4.5 分,滿分為 5。